
Testing software in a controlled environment is essential to ensure its functionality, security, and compatibility without impacting your primary system. A virtual machine (VM) offers the perfect solution for this. It allows you to run operating systems and applications in an isolated environment on your current computer, minimizing the risks associated with testing new software, potentially harmful files, or unfamiliar configurations. In this guide, we’ll explore how to use virtual machines to test software safely.
What is a Virtual Machine?
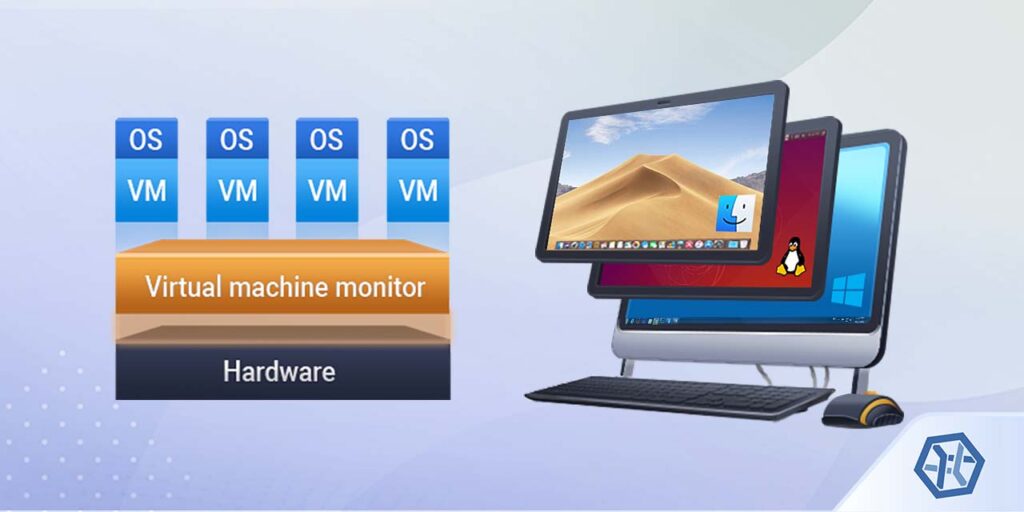
A virtual machine (VM) is a software emulation of a physical computer that runs an operating system (OS) and applications just like a regular computer. VMs are created using virtualization software, which allows you to allocate specific portions of your system’s resources (CPU, RAM, storage) to a virtual environment. The key benefit is that a VM runs in isolation, meaning actions performed within the VM don’t affect your host machine, providing an extra layer of security and flexibility.
Benefits of Using Virtual Machines for Testing:
- Isolation: Anything you do inside the VM does not affect your primary operating system. This makes it ideal for testing new software, configurations, or even malicious files.
- Snapshot and Revert Capabilities: Many virtualization tools let you take “snapshots” of the VM, enabling you to return to a known, stable state at any time. If the testing goes wrong, you can easily revert to a snapshot.
- Running Multiple OSes: You can test your software on different operating systems (Windows, Linux, macOS, etc.) without needing separate physical machines.
- Security: Testing potentially harmful software in a VM reduces the risk of viruses, malware, or system crashes impacting your actual working environment.
- Cost-Effective: Virtual machines are more affordable than purchasing and maintaining additional hardware.
Steps to Set Up a Virtual Machine for Software Testing

Step 1: Choose a Virtualization Software
To begin, you’ll need to choose a virtualization platform that allows you to create and manage virtual machines. Here are some popular choices:
- VMware Workstation/Player (Windows/Linux) – A widely-used tool for creating and managing VMs. VMware offers powerful features for both casual and advanced users.
- Oracle VM VirtualBox (Windows/Mac/Linux) – A free and open-source option that works across multiple platforms and supports a variety of operating systems.
- Parallels Desktop (Mac) – Best suited for Mac users, Parallels allows seamless integration between macOS and virtualized Windows environments.
- Hyper-V (Windows) – A hypervisor included in Windows 10 Pro and Enterprise editions that allows you to run VMs natively.
For this guide, we will focus on Oracle VM VirtualBox, but the process is similar across different virtualization platforms.
Step 2: Download and Install Virtualization Software
- Download VirtualBox from the official website.
- Install it by following the prompts for your operating system.
- After installation, launch VirtualBox to begin creating your VM.
Step 3: Create a New Virtual Machine
- Open VirtualBox and click on “New” to create a new virtual machine.
- Name your VM and select the type of operating system you want to install (Windows, Linux, macOS, etc.).
- Allocate resources (RAM, CPU, disk space) to the virtual machine. It’s a good practice to allocate at least 2 GB of RAM for testing purposes (more depending on the software you’re testing).
- RAM: Allocate at least 4GB for smoother performance (8GB or more is better for more resource-intensive tests).
- CPU cores: You can allocate multiple cores if your system supports it, but be sure to leave enough for your host operating system.
- Storage: Set up a virtual hard drive (VDI, VHD, or VMDK format), and allocate at least 20GB of space for the OS and testing software.
Step 4: Install the Operating System
Now you need to install the operating system inside your virtual machine:
- Insert the installation media (ISO file) for the OS you want to test. You can do this by selecting the ISO file in VirtualBox’s settings or inserting a bootable USB if you’re running on real hardware.
- Once the OS is selected, start the virtual machine. The VM will boot from the ISO and begin the OS installation process.
- Follow the standard OS installation steps as you would on a physical machine. Complete the setup process for the OS.
Step 5: Take a Snapshot (Optional but Recommended)
Once the OS installation is complete, it’s a good idea to take a snapshot. This allows you to return to a fresh, clean state if something goes wrong during the testing process.
- In VirtualBox, click on the “Snapshots” tab and click the camera icon to take a snapshot of the current state of your VM.
Step 6: Install Software and Begin Testing
With your VM set up and your OS installed, you can begin installing the software you want to test. Here’s how to proceed:
- Install the Software: Download and install the software or application you want to test inside the virtual machine.
- Perform Tests: Run the software as you would on a physical machine. You can test for functionality, performance, or even the presence of potential malware.
- Take Notes: Make sure to keep track of any issues or behaviors that arise. Take screenshots or make use of the VM’s shared clipboard and file systems to move data between the VM and host system.
Step 7: Revert to Snapshot or Delete VM (if necessary)
If something goes wrong during testing (e.g., the software causes system crashes, slows down the VM, or exhibits undesirable behavior), you can quickly revert to the snapshot you took earlier.
In VirtualBox:
- Select the VM.
- Go to the “Snapshots” tab and choose the snapshot you want to revert to.
- Click on “Restore” to roll the VM back to the chosen state.
Alternatively, if you no longer need the VM, you can simply delete it from VirtualBox, and all the data contained within it will be removed from your host system, leaving no trace of your testing.
Best Practices for Testing Software in a Virtual Machine
- Backup and Restore: Always take a snapshot before installing any software. This gives you a quick way to return to a clean state if something goes wrong.
- Isolate Potentially Dangerous Software: If you’re testing potentially dangerous or untrusted software (e.g., from unverified sources), make sure it’s done in an isolated VM to prevent any harm to your host system.
- Test Different Environments: Use VMs to test software across different operating systems or versions (e.g., test a Windows application on Windows 10, Windows 11, or different Linux distributions).
- Limit VM Resources: Avoid allocating too many resources to the VM to ensure that your host system doesn’t slow down. Keep a balance that allows both the host and guest systems to run smoothly.
- Enable Networking (When Needed): If your testing requires internet access (e.g., for testing web applications), make sure to enable networking in your VM settings. Be cautious when testing software that may have network vulnerabilities.
- Use VMs for Malware Testing: If you’re testing suspicious files or potential malware, run the software in a VM and disconnect the VM from your network to avoid spreading malicious code.
Conclusion
Using virtual machines to test software is an excellent strategy for maintaining a secure and risk-free environment, whether you’re evaluating new applications, experimenting with system configurations, or analyzing potentially malicious files. By setting up a VM and using snapshots, you can isolate your testing activities from your main system, giving you peace of mind. With the added flexibility and control that VMs provide, software testing becomes safer, easier, and more efficient.


